3.2 Understanding How Cameras Work
3.2.2 The Exposure Triangle
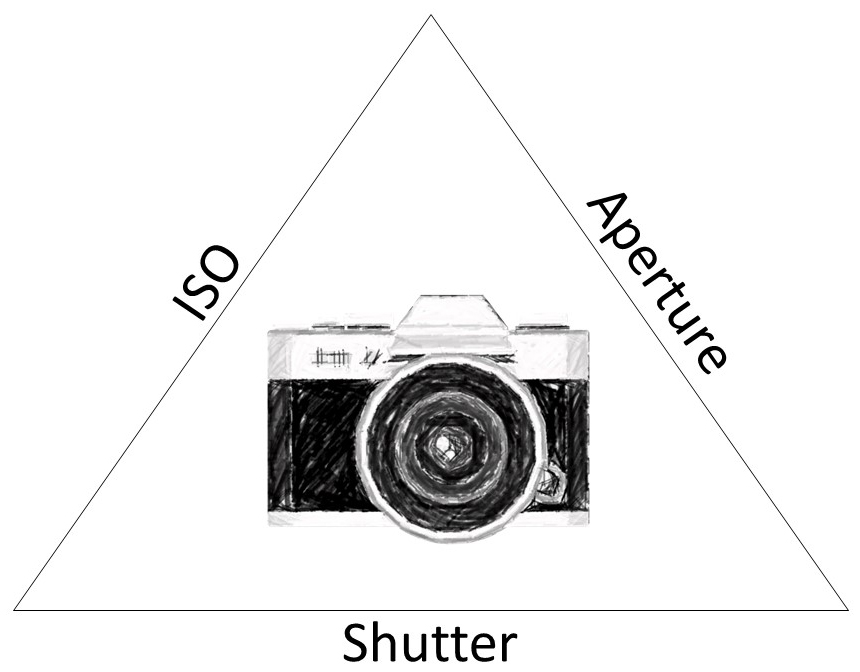
Exposure, determines how bright or dark an image will appear. To help you master the settings that determine the exposure of an image, we will go through the so-called, Exposure Triangle and its three elements: Aperture, Shutter, ISO, which define the area through which light will enter, the duration of the exposure, and the sensitivity of the camera's sensor to light respectively. Although this may sound relatively simple, changes in one of the parameters affect the others, as well as other elements of the captured photograph. For example, the size of the aperture also affects the sharpness of the image. We will go through each of these below.
 |
|
The Exposure Triangle |
Aperture
 |
|
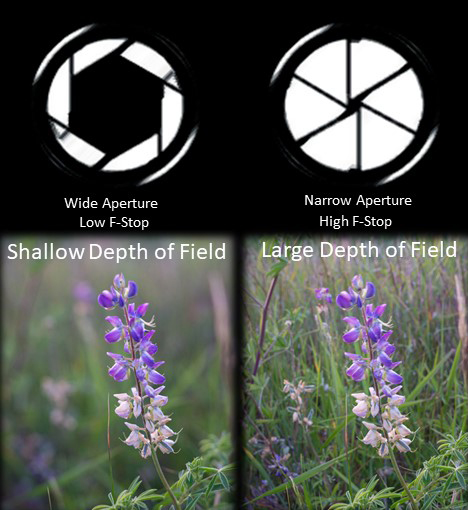
Depth of Field |
 |
|
Progression of Aperture Sizing |
Shutter
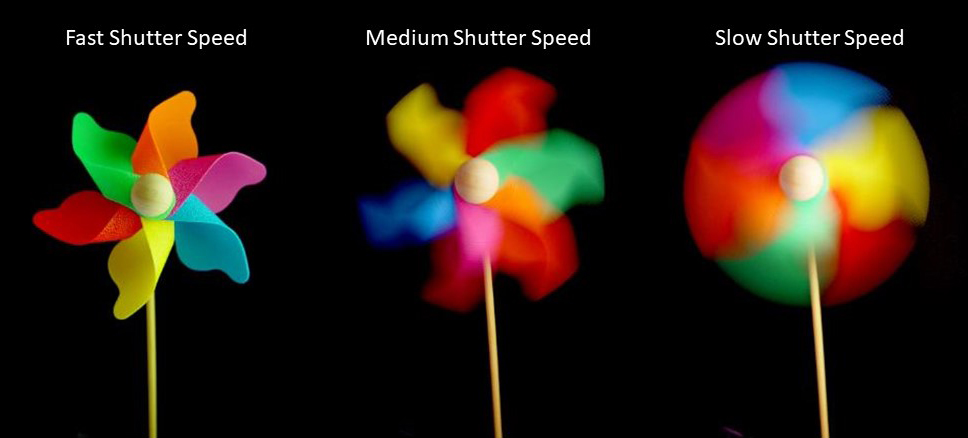
The shutter is some form of a 'curtain' in front of the sensor that opens by pressing the shutter button (i.e. the button you press to take a picture), thus exposing the camera sensor to light. As a result, the amount of time that the shutter will remain open determines the amount of light that enters the camera, and consequently, how bright or dark the image will appear. The shutter speed and the exposure time are two terms that are often used interchangeably since they refer to the same concept; the faster the shutter speed the shorter the exposure time and vice versa. It is also important to know that a slower shutter speed, and thus a longer exposure time can introduce motion blur. Sometimes such a blur is desirable, when for example you are capturing sports, but in most cases, and especially in the case of computational imaging, this should be avoided. Therefore, you may need either to increase the shutter speed (thus having the shutter stay open for a shorter time) and/or use a tripod to keep the camera steady. Shutter speed is measured in fractions of a second. For example, a shutter speed of 1/4 means that the shutter will remain open for a quarter of second, while 1/250 means that the exposure time will be one two-hundred-and-fiftieth of a second. Most DSLRs can handle much faster shutter speeds. For example, a Canon D80 has a shutter speed starting at 30 seconds reaching up to 1/8000.
 |
|
Shutter Speed |
ISO
The last of the three elements of the exposure triangle is the ISO, which determines how bright or dark your image will appear. As the ISO value is increased the picture will get brighter. For this reason, the use of ISO is particularly useful in dark environments. However, higher ISO values may cause an undesirable problem to your pictures, i.e. Noise, which can make them appear progressively grainier. Especially in computational imaging, this is not something that you would like to have, as any problems in your images will also pass to the digital representations you will produce. Therefore, it is strongly advised to use higher ISO values only if you cannot brighten your picture by changing the size of the Aperture and Shutter Speed. If there is sufficient light in your scene you would not have to go higher than ISO 100 or 200; however, a slightly higher value (ISO 400 or ISO 800) should also be problem free. Of course you should always take test captures to ensure that the images come out the way you want. Most cameras, especially DSLRs support a wide ISO range, with a Canon D80 ranging from ISO 100 to ISO 16000.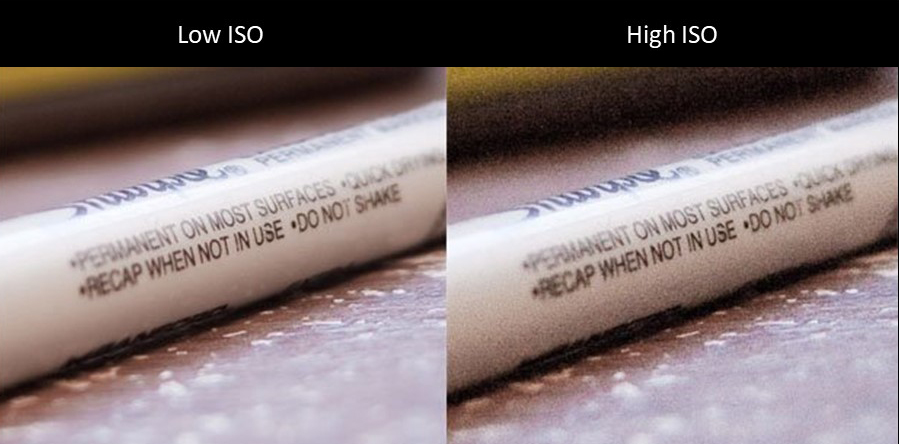 |
|
Noise Comparison |
Cheat Chart
The 'cheat chart' below will help you think about the Aperture (f-stops), Shutter Speed, and ISO settings of your camera. You can print it out and carry it with you, so you can see at a glance how your different settings will affect the captured image. Remember that all these changes also affect the light that enters through the scene. Therefore, a large/wide aperture and a slow shutter speed will let more light in, and therefore your picture will be brighter. However, these will result in a narrower depth of field and motion blur (if your camera is not stable or if your subject is moving). Therefore, it is important to always thing about trade-offs depending on what you would like to achieve.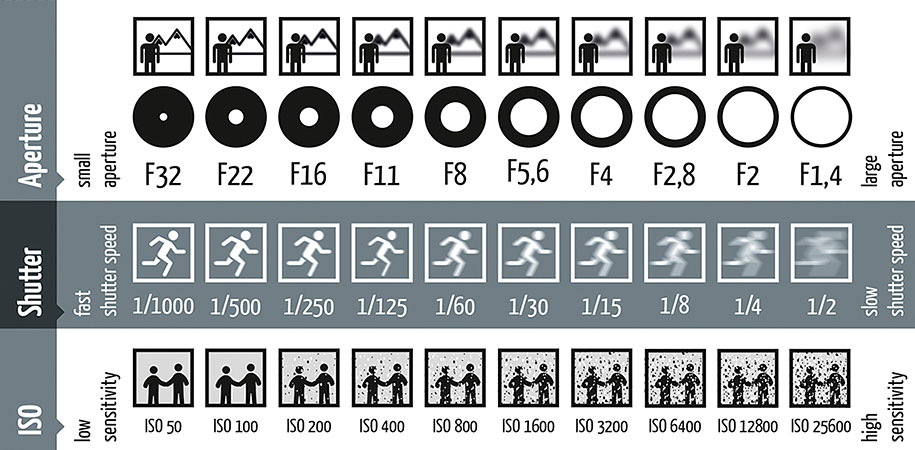 |
|
Cheat Chart (Click to enlarge the figure) |
Further Readings/Additional Resources
- 25 Technical Photography Terms Every Beginner Must Know: https://youtu.be/1OX5_8xVrEw
- Photography Made Easy - Complete Course: http://bit.ly/2L0hICH
- Camera Basics - Aperture: https://youtu.be/YojL7UQTVhc
- Camera Basics - ISO: https://youtu.be/q8cj9Lj9w-g
- Camera Basics - Focal Length: https://youtu.be/4CoEsqePADw
- Camera Basics - Shutter Speed: https://youtu.be/7R9ZTxoTOSk
- Camera Basics - Equivalent Exposures: https://youtu.be/KIQ05ZMcWxU

